知道夜的黑

记录与学习


  • 首页

  • 标签

  • 归档

  • 搜索

GIT凭据

发表于 2021-07-02 | 分类于 工具 | 阅读次数:

查看凭证

1
2
3
git config --global credential.helper

manager
  • manager 这种方式,在windows环境下会被window凭证管理
  • store git凭证会默认创建在cat ~/.git-credentials文件下

参阅资料

  • https://git-scm.com/book/zh/v2/Git-%E5%B7%A5%E5%85%B7-%E5%87%AD%E8%AF%81%E5%AD%98%E5%82%A8

GitLab 自动化构建

发表于 2021-02-03 | 分类于 CI/CD | 阅读次数:
  • GitLab CI/CD 是GitLab内置的工具,用于通过连续方法进行软件开发
  • 持续集成 的工作原理是将小的代码块推送到Git存储库中托管的应用程序代码库中,并且每次推送都运行一系列脚本来构建,测试和验证代码更改,然后再将其合并到主分支中。
  • GitLab Runner 是一个开源项目,用于运作任务,并把结果发送回GitLab,它与GitLab CI一起使用。

环境

  • 服务器 CentOS 7

GitLab 安装

  • 安装文档
    https://about.gitlab.com/install/#centos-7

  • 修改配置文件

    1
    2
    3
    4
    5
    6
    7
    8
    vi /etc/gitlab/gitlab.rb
    external_url 'http://192.168.235.128:9090'
    nginx['listen_port'] = 9090

    vi /var/opt/gitlab/nginx/conf/gitlab-http.conf
    server {
    listen *:9090;
    server_name 192.168.235.128;
  • 使配置生效

    1
    gitlab-ctl reconfigure
  • 启动

    1
    gitlab-ctl start

GitLab Runer 安装

  • 安装文档
    https://docs.gitlab.com/runner/install/linux-manually.html

  • 项目中配置
    默认 gitlab-runner 安装使用 gitlab-runner 用户执行命令,这里会遇到用户权限问题,需要修改用户权限或者修改默认用户。

    修改默认用户为 root

    1
    2
    3
    sudo gitlab-runner uninstall
    sudo gitlab-runner install --user=root --working-directory=/home/gitlab-runner
    sudo gitlab-runner restart

    查看用户是否修改成功

    1
    2
    3
    [root@localhost ~]# ps aux | grep gitlab-runner
    root 1174 1.1 0.2 138140 20708 ? Ssl 08:22 3:51 /usr/bin/gitlab-runner run --working-directory /home/gitlab-runner --config /etc/gitlab-runner/config.toml --service gitlab-runner --syslog --user root
    root 17883 0.0 0.0 112828 984 pts/1 S+ 13:54 0:00 grep --color=auto gitlab-runner

    对需要自动化构建的项目注册 gitlab-runner

    1
    2
    3
    4
    5
    [root@localhost ~]# sudo gitlab-runner register
    Runtime platform arch=amd64 os=linux pid=16876 revision=738bbe5a version=13.3.1
    Running in system-mode.

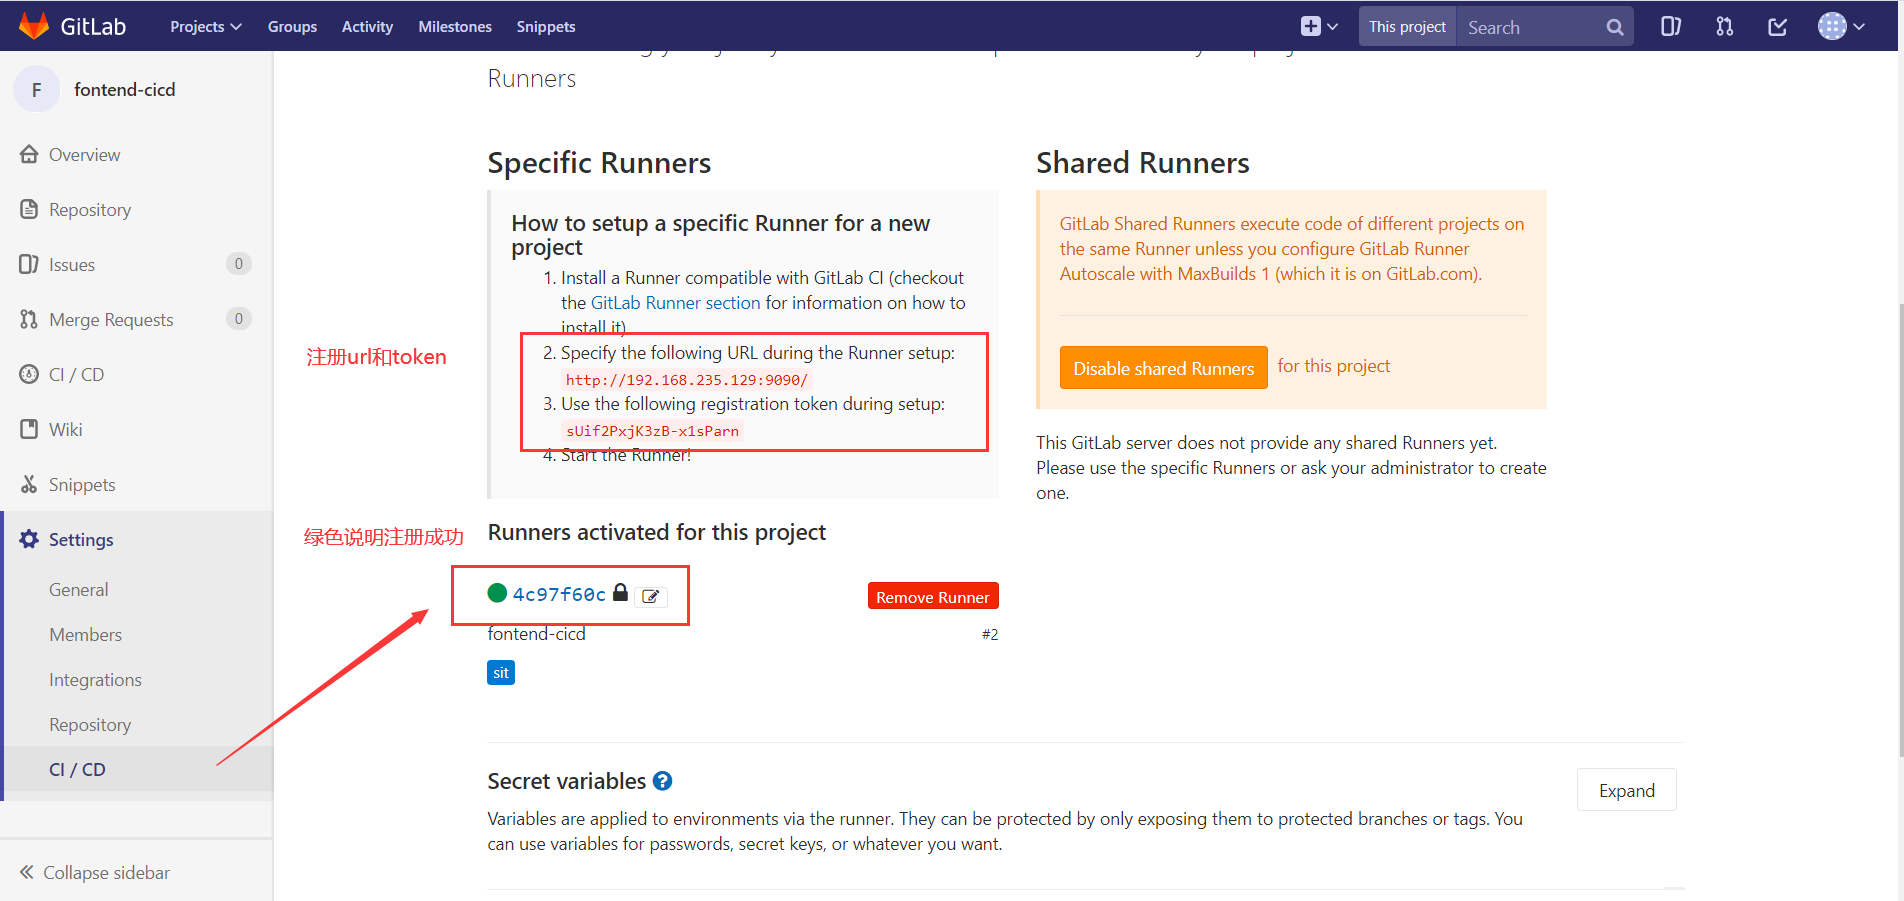
    Please enter the gitlab-ci coordinator URL (e.g. https://gitlab.com/):

    值参考截图

    查看注册成功后的项目

    1
    2
    3
    4
    5
    6
    7
    8
    9
    10
    11
    12
    13
    14
    15
    16
    17
    18
    19
    20
    21
    22
    23
    24
    25
    26
    27
    28
    29
    30
    31
    32
    33
    34
    35
    36
    [root@localhost ~]# cat /etc/gitlab-runner/config.toml
    concurrent = 1
    check_interval = 0

    [session_server]
    session_timeout = 1800

    [[runners]]
    name = "project-cicd --> settings --> ci/cd"
    url = "http://192.168.235.129:9090/"
    token = "4cc764522780c8f518a97f3dc508c7"
    executor = "shell"
    [runners.custom_build_dir]
    [runners.cache]
    [runners.cache.s3]
    [runners.cache.gcs]

    [[runners]]
    name = "fontend-cicd"
    url = "http://192.168.235.129:9090/"
    token = "4c97f60c414ea508e3c6733d2033a1"
    executor = "shell"
    [runners.custom_build_dir]
    [runners.cache]
    [runners.cache.s3]
    [runners.cache.gcs]

    [[runners]]
    name = "后端项目"
    url = "http://192.168.235.129:9090/"
    token = "0a183b8545b6d6364dcfe3635eee18"
    executor = "shell"
    [runners.custom_build_dir]
    [runners.cache]
    [runners.cache.s3]
    [runners.cache.gcs]

项目中新建 .gitlab-ci.yml 文件

  • 安装 sshpass ssh只能回车后输入密码登录

    1
    yum -y install sshpass
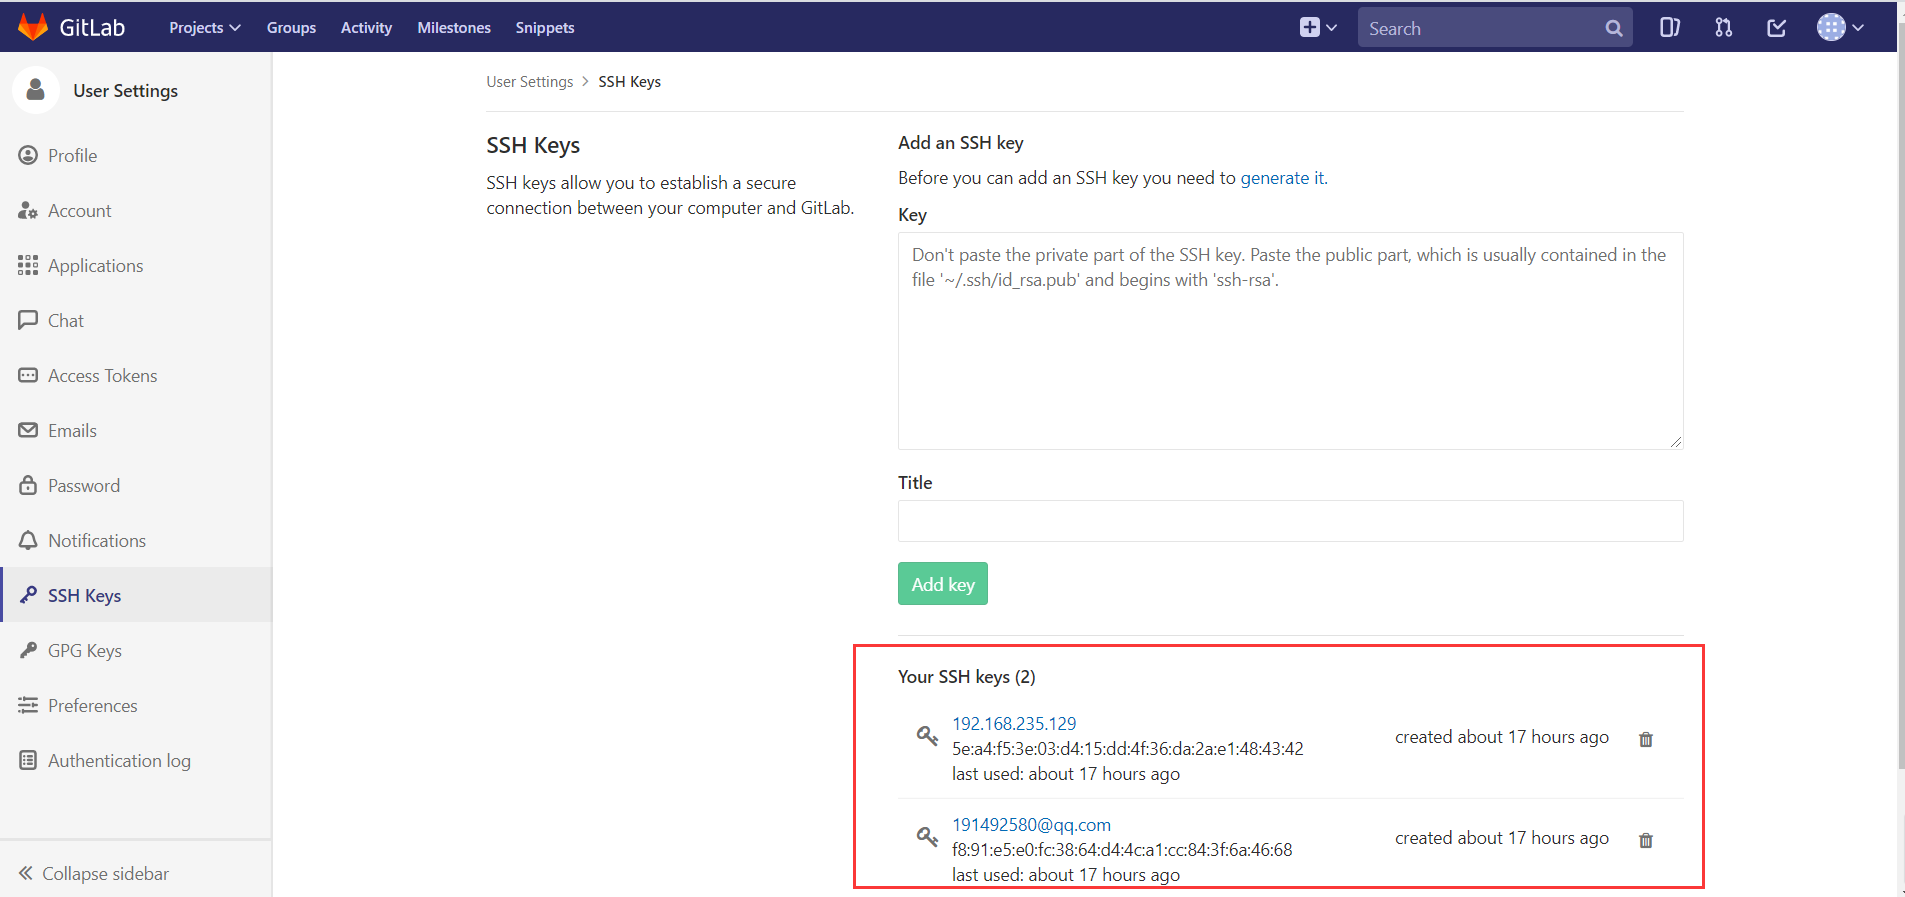
  • 添加 ssh key 自动化执行脚本,clone项目避免输入用户名和密码;没有 ssh key 需要自己手动生成

    获取 key

    1
    cat ~/.ssh/id_rsa.pub

    生成 key

    1
    ssh-keygen -t rsa -C "your.email@example.com" -b 4096

    配置 key
    值参考截图

  • 设置变量 .yml 文件中会做 ssh 登录操作,像 password,ip 这些信息不便直接写在脚本中
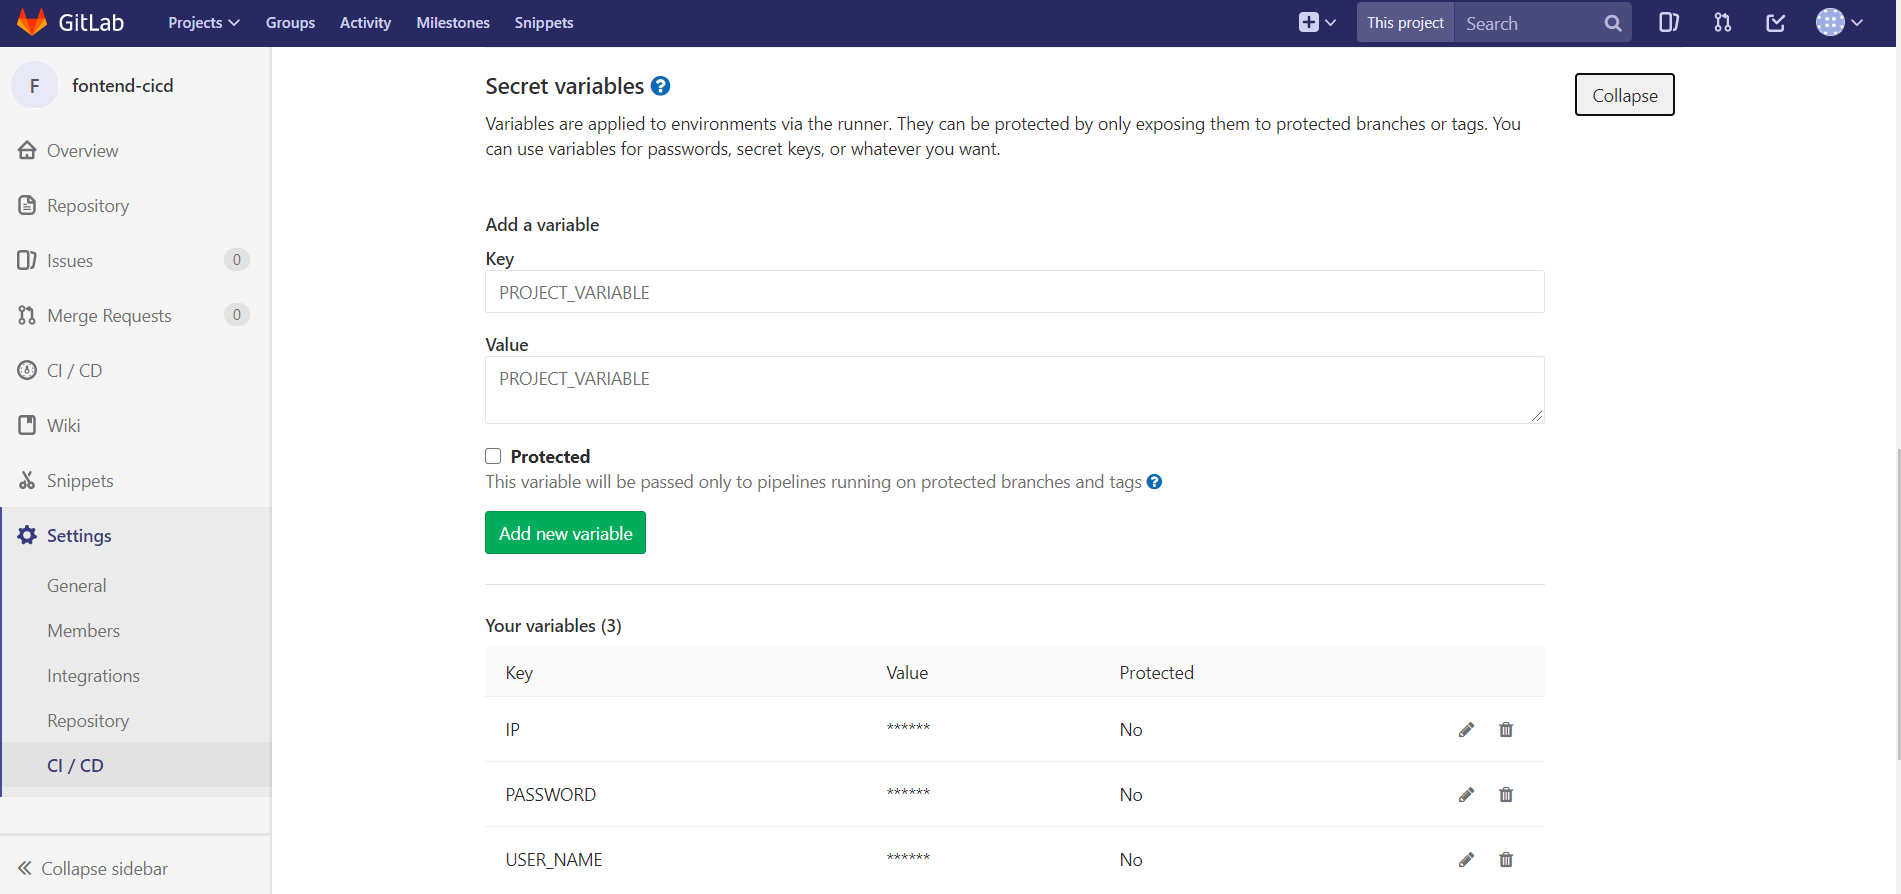
    值参考截图

  • 前端 .yml 文件示例

    1
    2
    3
    4
    5
    6
    7
    8
    9
    10
    11
    12
    13
    14
    15
    16
    17
    18
    19
    20
    21
    22
    23
    24
    25
    26
    27
    28
    29
    30
    31
    32
    33
    34
    35
    36
    37
    38
    39
    40
    41
    42
    43
    44
    45
    stages: # 分段
    - install
    - build
    - deploy-sit
    - deploy-prod
    cache: # 缓存
    paths:
    - node_modules
    - dist
    install-job:
    tags:
    - sit
    only:
    - sit
    - prod
    stage: install
    script:
    - cnpm install

    build-job:
    tags:
    - sit
    only:
    - sit
    - prod
    stage: build
    script:
    - npm run build
    deploy-sit-job:
    tags:
    - sit
    only:
    - sit
    stage: deploy-sit
    script:
    - sshpass -p $PASSWORD scp -r ./dist/* $USER_NAME@$IP:/root/backend-cicd/app/public

    deploy-prod-job:
    tags:
    - sit
    only:
    - prod
    stage: deploy-prod
    script:
    - sshpass -p $PASSWORD scp -r ./dist/* $USER_NAME@$IP:/root/backend-cicd/app/public
  • node 后端 .yml 文件示例

    1
    2
    3
    4
    5
    6
    7
    8
    9
    10
    11
    12
    13
    14
    15
    16
    17
    18
    19
    20
    21
    22
    23
    24
    25
    26
    27
    28
    29
    30
    31
    32
    33
    34
    35
    36
    37
    38
    39
    40
    41
    42
    stages: # 分段
    - deploy-sit
    - deploy-prod
    cache: # 缓存
    paths:
    - node_modules
    before_script:
    - sshpass -p $PASSWORD ssh $USERNAME@$IP -o StrictHostKeyChecking=no
    - cd ~
    - ([ -d /root/backend-cicd/app/public ] && mv /root/backend-cicd/app/public /root/public) || echo
    - rm -rf ./backend-cicd
    - git clone git@192.168.235.129:zhongs/backend-cicd.git
    - ([ -d /root/public ] && mv /root/public /root/backend-cicd/app/public) || echo
    - cd ./backend-cicd

    deploy-sit-job:
    tags:
    - backend-cicd
    only:
    - sit
    stage: deploy-sit
    script:
    - pwd
    - git checkout sit
    - cnpm install
    - npm run stop
    - npm run start-sit
    - exit

    deploy-prod-job:
    tags:
    - backend-cicd
    only:
    - prod
    stage: deploy-prod
    script:
    - pwd
    - git checkout prod
    - cnpm install
    - npm run stop
    - npm run start-prod
    - exit

参阅资料

  • https://mp.weixin.qq.com/s/vllbzDjE7sraZj9axk1u4A

ali-oss 同步到 minio

发表于 2021-02-02 | 分类于 数据迁移 | 阅读次数:
  • Rclone 是一个命令行程序,用于管理云存储上的文件。它是云供应商Web存储界面的功能丰富的替代方案。超过40种云存储产品支持rclone,包括S3对象存储,业务和消费者文件存储服务以及标准传输协议。Rclone具有等效于unix命令rsync,cp,mv,mount,ls,ncdu,tree,rm和cat的强大的云功能。 Rclone熟悉的语法包括Shell管道支持和–dry-run保护。它可在命令行,脚本或通过其API使用。用户将rclone称为“云存储的瑞士军刀”和“与魔术不可区分的技术”。

  • amazon (S3) 是一个公开的服务,Web 应用程序开发人员可以使用它存储数字资产,包括图片、视频、音乐和文档。 S3 提供一个 RESTful API 以编程方式实现与该服务的交互。

环境

  • 服务器 CentOS 7

rclone 安装

1
curl https://rclone.org/install.sh | sudo bash

修改配置文件

  • ~/.config/rclone/rclone.conf
1
2
3
4
5
6
7
8
9
10
11
12
13
14
15
16
17
18
19
20
21
22
[root@localhost ~]# cat .config/rclone/rclone.conf

[oss-cn-beijing]
type = s3
provider = Alibaba
env_auth = false
access_key_id = <YOUR_ACCESS_KEY_ID> # 阿里云后台查看
secret_access_key = <YOUR_SECRET_ACCESS_KEY> # 阿里云后台查看
endpoint = <YOUR_REGION>.aliyuncs.com # 阿里云后台查看
acl = private
storage_class = Standard


[minio]
type = s3
env_auth = false
access_key_id = minio
secret_access_key = minio123
region = us-east-1
endpoint = http://127.0.0.1:9000
location_constraint =
server_side_encryption =

同步

  • 将 ali-oss 同步到 minio --transfers 设置并发数量 -P 显示实时进度
1
rclone sync -P oss-cn-beijing:bucket-test007 minio:test --transfers=10

参阅资料

  • https://rclone.org/
  • https://sunpma.com/864.html
  • https://yq.aliyun.com/articles/749107
知道夜的黑

知道夜的黑

3 日志
3 分类
3 标签
GitHub
© 2017 — 2021 知道夜的黑
访问人数 总访问量 次