- GitLab
CI/CD是GitLab内置的工具,用于通过连续方法进行软件开发 持续集成的工作原理是将小的代码块推送到Git存储库中托管的应用程序代码库中,并且每次推送都运行一系列脚本来构建,测试和验证代码更改,然后再将其合并到主分支中。GitLab Runner是一个开源项目,用于运作任务,并把结果发送回GitLab,它与GitLab CI一起使用。
环境
- 服务器 CentOS 7
GitLab 安装
修改配置文件
1
2
3
4
5
6
7
8
vi /etc/gitlab/gitlab.rb
external_url 'http://192.168.235.128:9090'
nginx['listen_port'] = 9090
vi /var/opt/gitlab/nginx/conf/gitlab-http.conf
server {
listen *:9090;
server_name 192.168.235.128;使配置生效
1
gitlab-ctl reconfigure
启动
1
gitlab-ctl start
GitLab Runer 安装
安装文档
https://docs.gitlab.com/runner/install/linux-manually.html项目中配置
默认 gitlab-runner 安装使用 gitlab-runner 用户执行命令,这里会遇到用户权限问题,需要修改用户权限或者修改默认用户。修改默认用户为
root1
2
3sudo gitlab-runner uninstall
sudo gitlab-runner install --user=root --working-directory=/home/gitlab-runner
sudo gitlab-runner restart查看用户是否修改成功
1
2
3[root@localhost ~]# ps aux | grep gitlab-runner
root 1174 1.1 0.2 138140 20708 ? Ssl 08:22 3:51 /usr/bin/gitlab-runner run --working-directory /home/gitlab-runner --config /etc/gitlab-runner/config.toml --service gitlab-runner --syslog --user root
root 17883 0.0 0.0 112828 984 pts/1 S+ 13:54 0:00 grep --color=auto gitlab-runner对需要自动化构建的项目注册 gitlab-runner
1
2
3
4
5[root@localhost ~]# sudo gitlab-runner register
Runtime platform arch=amd64 os=linux pid=16876 revision=738bbe5a version=13.3.1
Running in system-mode.
Please enter the gitlab-ci coordinator URL (e.g. https://gitlab.com/):
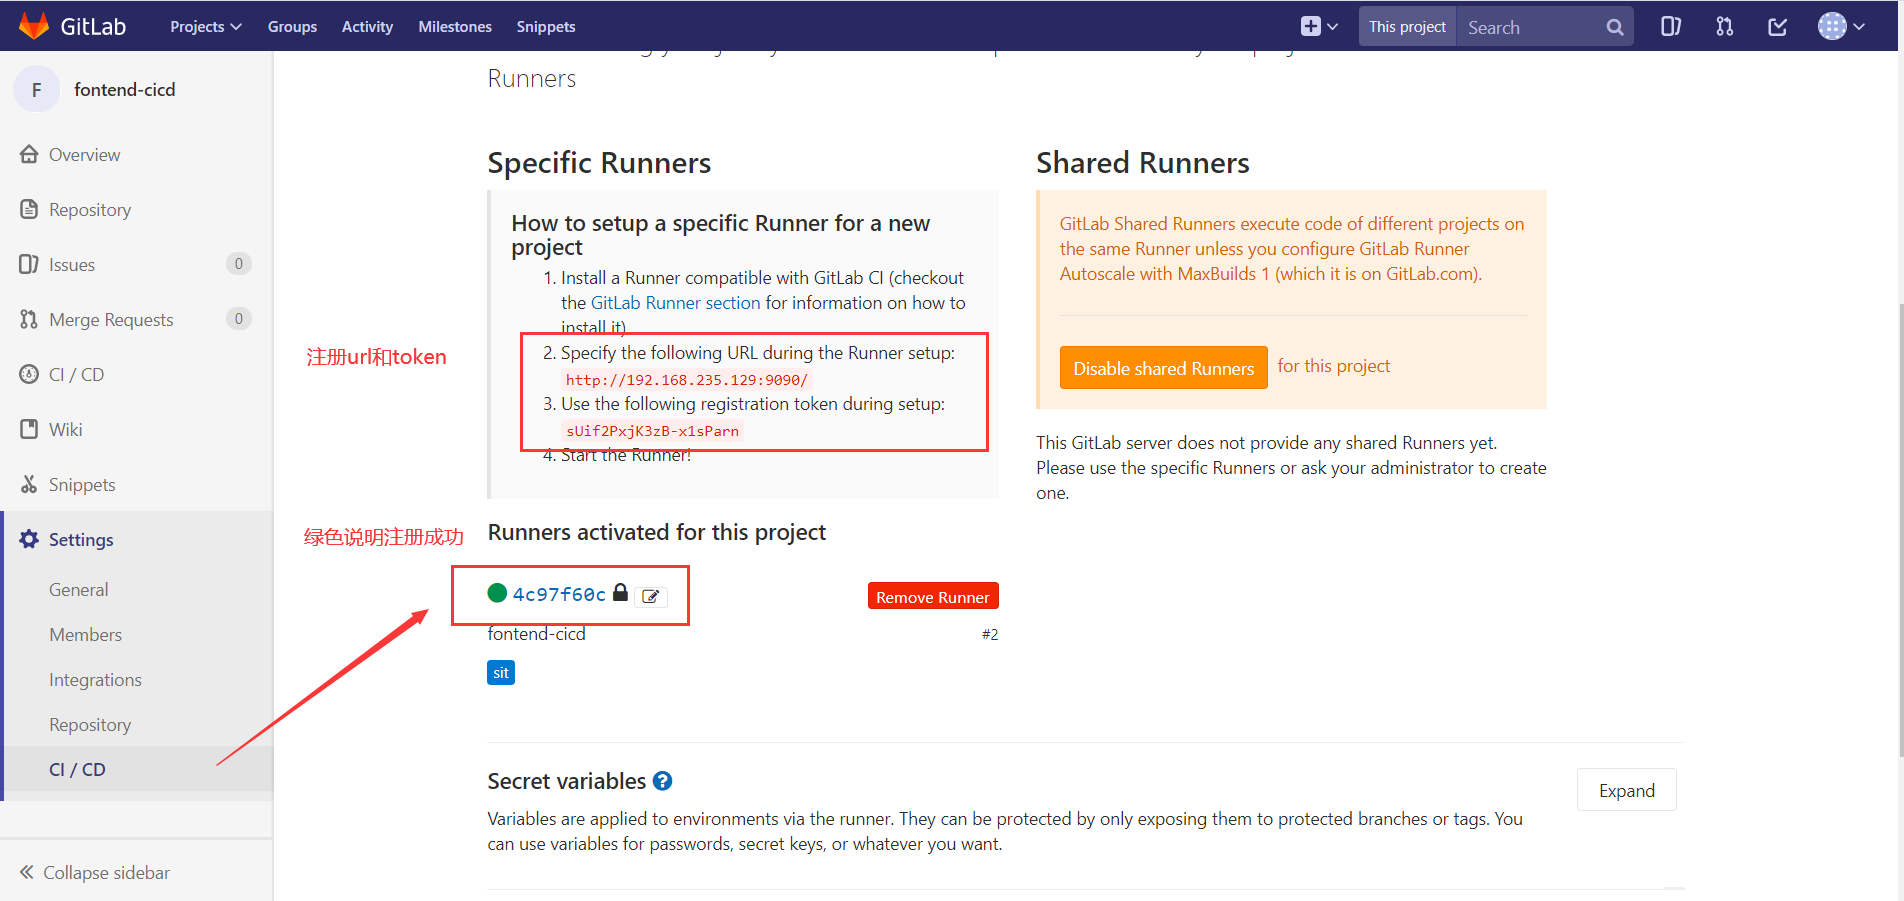
查看注册成功后的项目
1
2
3
4
5
6
7
8
9
10
11
12
13
14
15
16
17
18
19
20
21
22
23
24
25
26
27
28
29
30
31
32
33
34
35
36[root@localhost ~]# cat /etc/gitlab-runner/config.toml
concurrent = 1
check_interval = 0
[session_server]
session_timeout = 1800
[[runners]]
name = "project-cicd --> settings --> ci/cd"
url = "http://192.168.235.129:9090/"
token = "4cc764522780c8f518a97f3dc508c7"
executor = "shell"
[runners.custom_build_dir]
[runners.cache]
[runners.cache.s3]
[runners.cache.gcs]
[[runners]]
name = "fontend-cicd"
url = "http://192.168.235.129:9090/"
token = "4c97f60c414ea508e3c6733d2033a1"
executor = "shell"
[runners.custom_build_dir]
[runners.cache]
[runners.cache.s3]
[runners.cache.gcs]
[[runners]]
name = "后端项目"
url = "http://192.168.235.129:9090/"
token = "0a183b8545b6d6364dcfe3635eee18"
executor = "shell"
[runners.custom_build_dir]
[runners.cache]
[runners.cache.s3]
[runners.cache.gcs]
项目中新建 .gitlab-ci.yml 文件
安装 sshpass ssh只能回车后输入密码登录
1
yum -y install sshpass
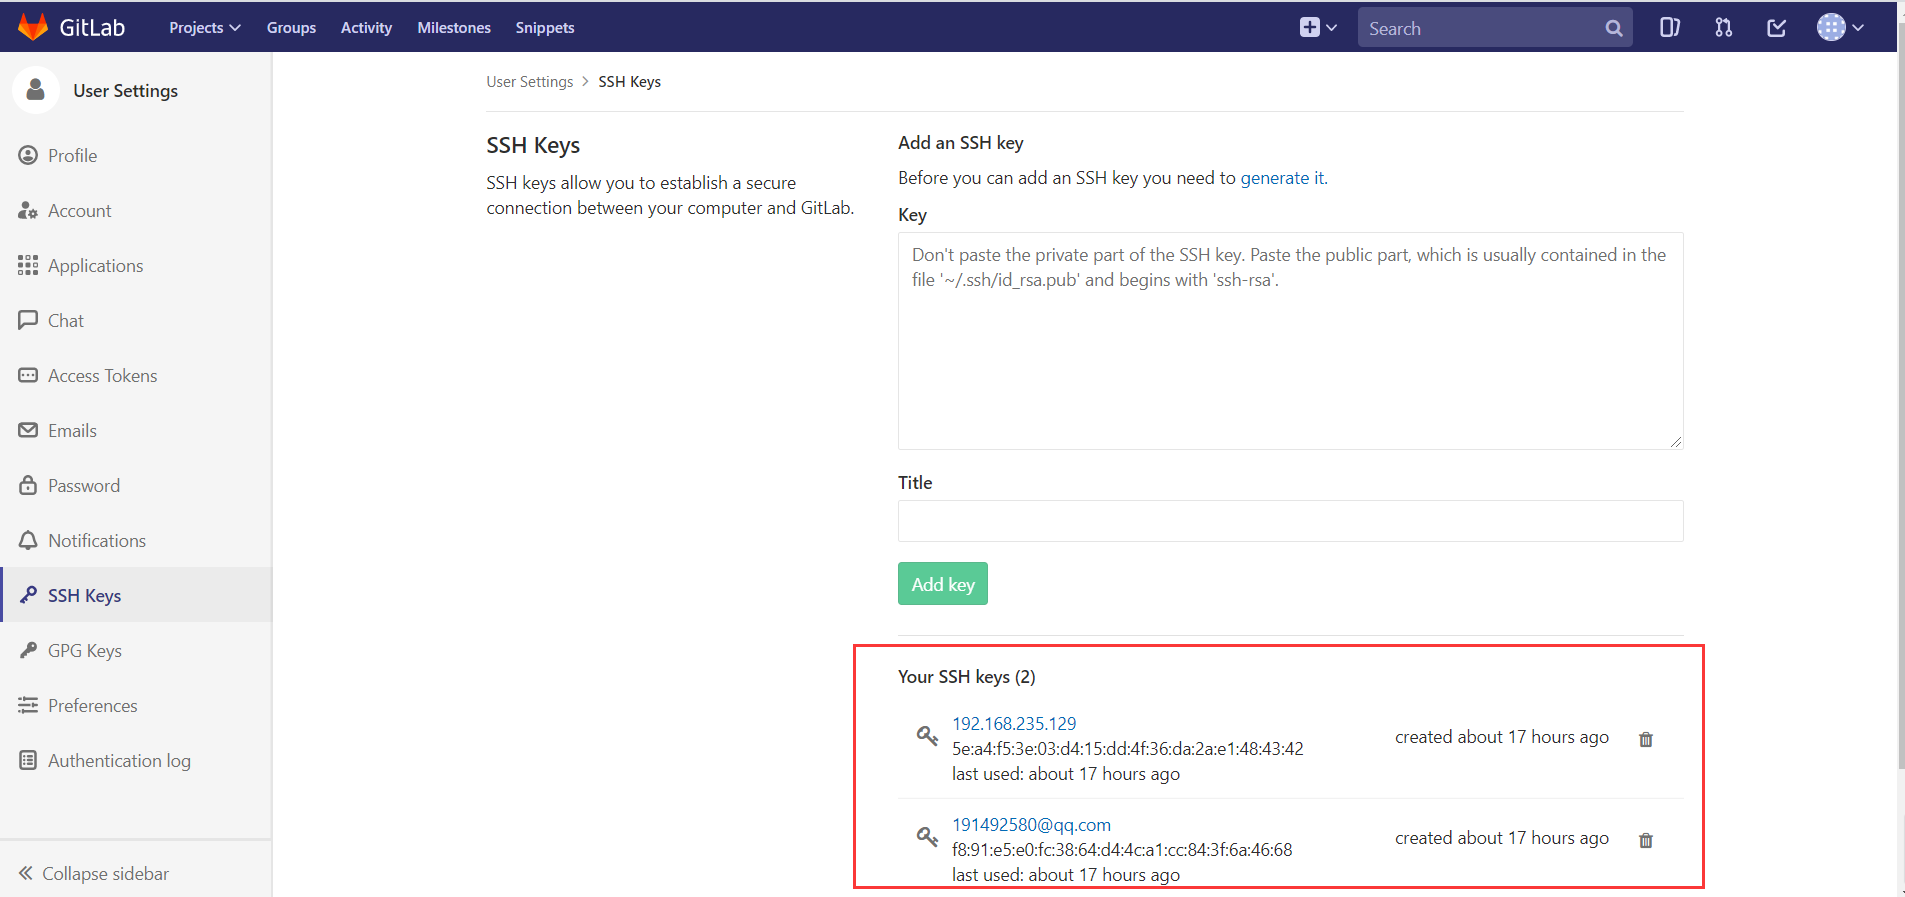
添加 ssh key 自动化执行脚本,clone项目避免输入用户名和密码;没有 ssh key 需要自己手动生成
获取 key
1
cat ~/.ssh/id_rsa.pub
生成 key
1
ssh-keygen -t rsa -C "your.email@example.com" -b 4096
配置 key

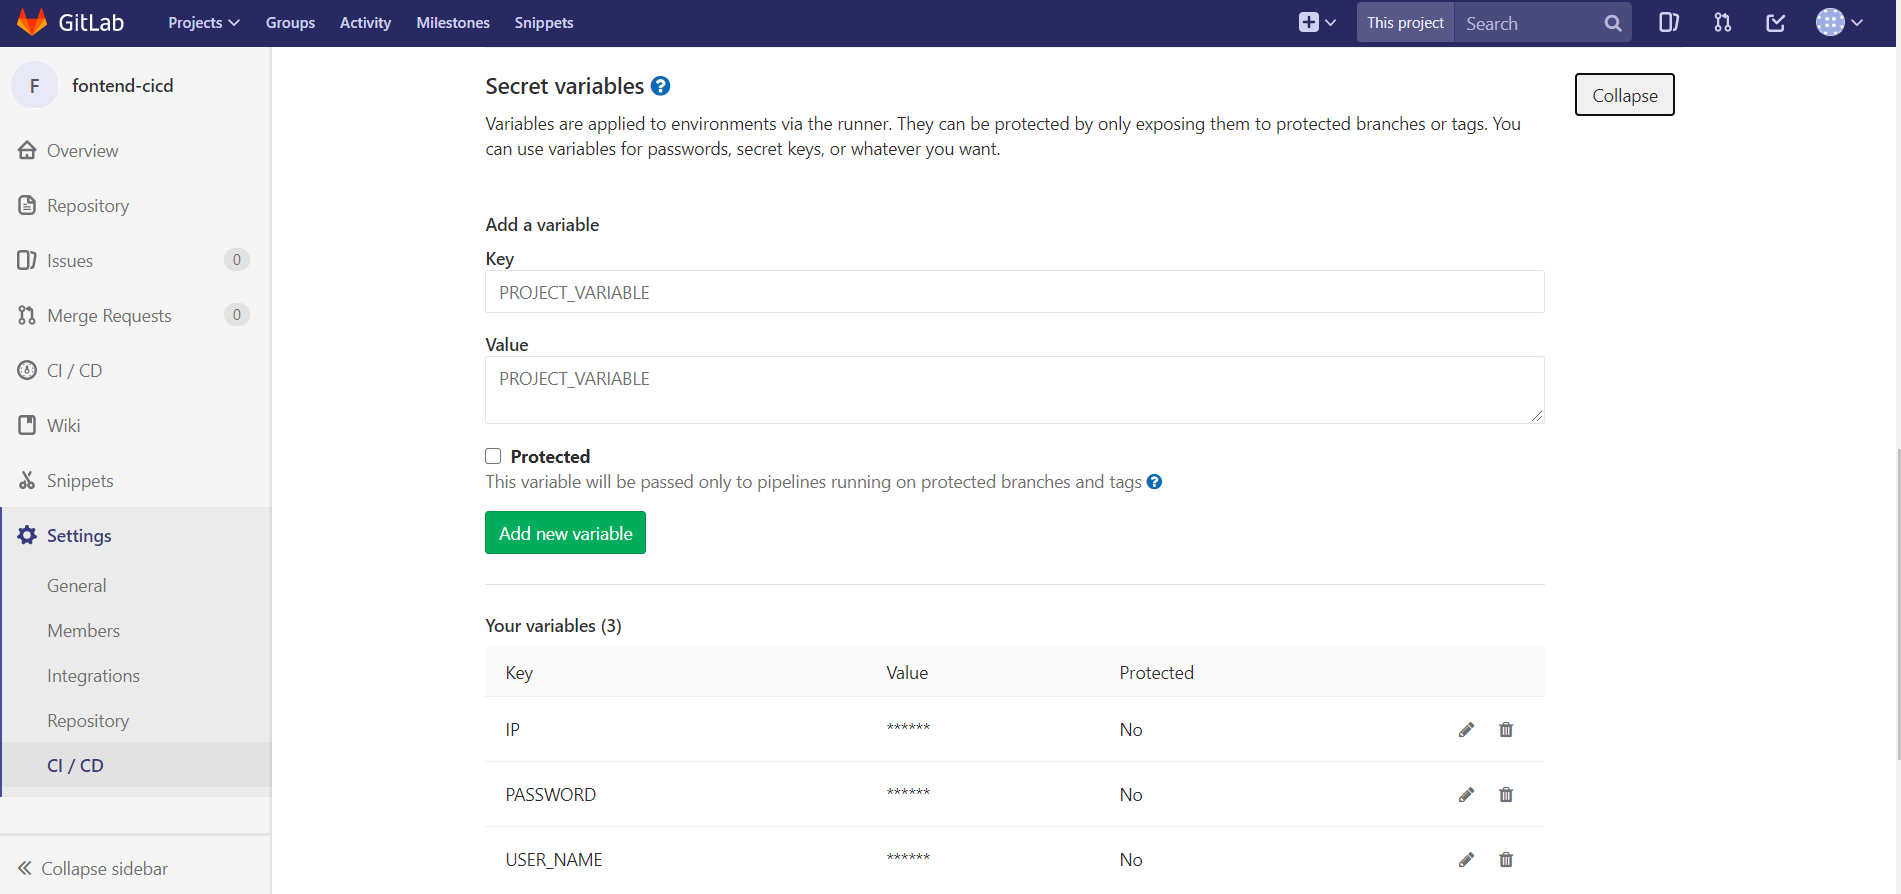
设置变量 .yml 文件中会做 ssh 登录操作,像 password,ip 这些信息不便直接写在脚本中

前端 .yml 文件示例
1
2
3
4
5
6
7
8
9
10
11
12
13
14
15
16
17
18
19
20
21
22
23
24
25
26
27
28
29
30
31
32
33
34
35
36
37
38
39
40
41
42
43
44
45stages: # 分段
- install
- build
- deploy-sit
- deploy-prod
cache: # 缓存
paths:
- node_modules
- dist
install-job:
tags:
- sit
only:
- sit
- prod
stage: install
script:
- cnpm install
build-job:
tags:
- sit
only:
- sit
- prod
stage: build
script:
- npm run build
deploy-sit-job:
tags:
- sit
only:
- sit
stage: deploy-sit
script:
- sshpass -p $PASSWORD scp -r ./dist/* $USER_NAME@$IP:/root/backend-cicd/app/public
deploy-prod-job:
tags:
- sit
only:
- prod
stage: deploy-prod
script:
- sshpass -p $PASSWORD scp -r ./dist/* $USER_NAME@$IP:/root/backend-cicd/app/publicnode 后端 .yml 文件示例
1
2
3
4
5
6
7
8
9
10
11
12
13
14
15
16
17
18
19
20
21
22
23
24
25
26
27
28
29
30
31
32
33
34
35
36
37
38
39
40
41
42
stages: # 分段
- deploy-sit
- deploy-prod
cache: # 缓存
paths:
- node_modules
before_script:
- sshpass -p $PASSWORD ssh $USERNAME@$IP -o StrictHostKeyChecking=no
- cd ~
- ([ -d /root/backend-cicd/app/public ] && mv /root/backend-cicd/app/public /root/public) || echo
- rm -rf ./backend-cicd
- git clone git@192.168.235.129:zhongs/backend-cicd.git
- ([ -d /root/public ] && mv /root/public /root/backend-cicd/app/public) || echo
- cd ./backend-cicd
deploy-sit-job:
tags:
- backend-cicd
only:
- sit
stage: deploy-sit
script:
- pwd
- git checkout sit
- cnpm install
- npm run stop
- npm run start-sit
- exit
deploy-prod-job:
tags:
- backend-cicd
only:
- prod
stage: deploy-prod
script:
- pwd
- git checkout prod
- cnpm install
- npm run stop
- npm run start-prod
- exit